大数据之配置本地虚拟机集群

概述

大数据需要多台服务器集群, 如果用云服务器的话让很多新手都望之却步, 我们来配置穷逼本地虚拟机集群.这也为后面的hadoop和spark开发做准备.让我们键盘作伴开始吧.

安装Ubuntu Server

在安装ubuntu之前,需要安装虚拟机软件,本文使用Vmare15, 安装配置自行搞定.

  1. 下载Ubuntu server 18.10: 下载地址
  2. 安装过程参考官网: 教程

下面说明介个问题:

  • VMare 网络适配器连接方式:
    • 桥接模式:这个模式就像是虚拟出来的一个独立的主机,可以访问物理网络,但是需要自行配置IP地址, 子网掩码,而且必须和宿主机器处于同一网段.
    • NAT模式: 这种是应用在Internet网关和路由器上,虚拟出一个网卡,虚拟出来的网卡和虚拟机的IP处于一个地址段.
    • 仅主机模式(host only): 只是让主机和虚拟机之间的网络互动, 虚拟机访问不到Internet.

虚拟机安装完毕!!!!

设置网络模式:

  • vmare: 编辑 -> 选择网络选择器 -> 将vmnet1主机模式设置 ->
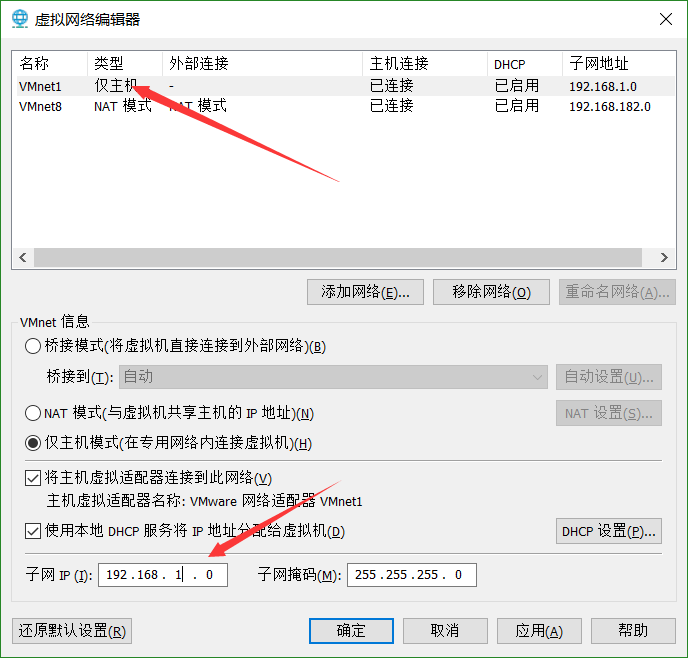
  • 设置主机的网络: 打开网络和Internet设置 -> 以太网 -> 更换适配器选项 -> 右键VMnet1属性 ->

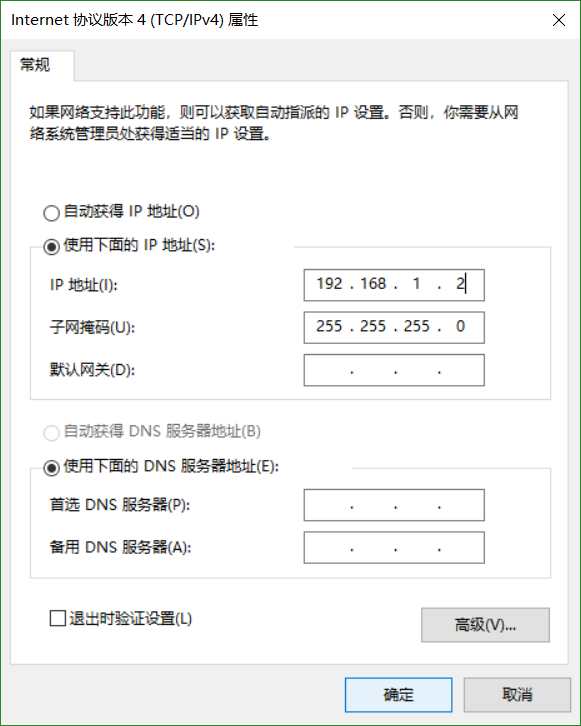
设置基本原则: 虚拟机采用静态IP,与VMare1处于一个网段内.

  • 虚拟机选择桥接模式

  • 修改系统参数

    • 修改主机名: /etc/hostname
    • 修改系统网络参数: /etc/network/interfaces
    1
    2
    3
    4
    5
    6
    7
    auto eth0
    #iface eth0 inet dhcp dhcp的配置
    iface eth0 inet static # eth0设置为静态IP
    address 192.168.1.45
    netmast 255.255.255.0
    gateway 192.168.1.1
    broadcast 192.168.1.255

    mac地址配置文件: /etc/udev.rules.d/70-persistent-net.rules 如果克隆虚拟机找不到网卡就rm掉这个文件.

    1
    2
    3
    4
    # 网络生效
    sudo /etc/init.d/networking restart
    # or
    sudo ifup eth0
    • 修改DNS配置

    配置: 在/etc/resolvconf/resolv.conf.d/新建一个tail文件写入:

    1
    2
    nameserver 192.168.1.1
    nameserver xx.xx.xx.xx

远程控制server

1
2
3
4
sudo apt update
sudo apt upgrade
sudo apt install openssh-server #ubuntu18已经安装好了
sudo apt install openssh-client

安装JDK

使用没有界面的jdk所用需要使用wget来下载jdk,安装openjdk也是一样;

1
2
3
4
5
6
7
8
9
10
11
# 只有这样才能下载成功
> wget --no-check-certificate --no-cookies --header "Cookie: oraclelicense=accept-securebackup-cookie" https://download.oracle.com/otn-pub/java/jdk/8u191-b12/2787e4a523244c269598db4e85c51e0c/jdk-8u191-linux-x64.tar.gz
# 解压
> tar -zxvf jdk-8u191-linux-x64.tar.gz -C /usr/lib/jvm/
> sudo ln -s jdk1.8.0_191 java

# 下载scala
> wget --no-check-certificate --no-cookies --header "Cookie: oraclelicense=accept-securebackup-cookie" https://downloads.lightbend.com/scala/2.12.8/scala-2.12.8.tgz
> tar zxvf scala-2.12.8.tgz -C /usr/lib/jvm/
> cd /usr/lib/jvm/
> sudo ln -s scala-2.12.8 scala

测试Scala

1
2
3
4
5
6
7
8
9
10
11
12
13
14
15
16
17
18
19
20
21
22
23
24
25
26
27
28
29
30
31
xyxj@u18_data1:~$ scala
Welcome to Scala 2.12.8 (Java HotSpot(TM) 64-Bit Server VM, Java 1.8.0_191).
Type in expressions for evaluation. Or try :help.
scala> :help
All commands can be abbreviated, e.g., :he instead of :help.
:completions <string> output completions for the given string
:edit <id>|<line> edit history
:help [command] print this summary or command-specific help
:history [num] show the history (optional num is commands to show)
:h? <string> search the history
:imports [name name ...] show import history, identifying sources of names
:implicits [-v] show the implicits in scope
:javap <path|class> disassemble a file or class name
:line <id>|<line> place line(s) at the end of history
:load <path> interpret lines in a file
:paste [-raw] [path] enter paste mode or paste a file
:power enable power user mode
:quit exit the interpreter
:replay [options] reset the repl and replay all previous commands
:require <path> add a jar to the classpath
:reset [options] reset the repl to its initial state, forgetting all session entries
:save <path> save replayable session to a file
:sh <command line> run a shell command (result is implicitly => List[String])
:settings <options> update compiler options, if possible; see reset
:silent disable/enable automatic printing of results
:type [-v] <expr> display the type of an expression without evaluating it
:kind [-v] <type> display the kind of a type. see also :help kind
:warnings show the suppressed warnings from the most recent line which had any

# 退出
scala> :quit

环境变量

1
2
3
4
5
6
7
# jdk
export JAVA_HOME=/usr/lib/jvm/java
export PATH=$PATH:$JAVA_HOME/bin:$JAVA_HOME/jre/bin

# scala
export SCALA_HOME=/usr/lib/jvm/scala
export PATH=$PATH:$SCALA_HOME/bin

免密钥登录

需要使用ssh-keygen创建一对公私钥. 由于ubuntu18已经安装ssh,如果没有安装需要安装:

1
2
3
sudo apt install ssh
# create
ssh-keygen -t rsa

略…..

  1. 先将win10免密钥登录主虚拟机

将win10上的公钥拷贝到/.ssh/authorized_keys

  1. 然后将各个界面的公钥相互验证….完毕

安装Hadoop

官网: 全部版本下载地址

下载2.6.0版本

1
2
$ wget --no-check-certificate --no-cookies --header "Cookie: oraclelicense=accept-securebackup-cookie" https://archive.apache.org/dist/hadoop/common/hadoop-2.6.0/hadoop-2.6.0.tar.gz
$ sudo tar zxvf hadoop-2.6.0.tar.gz -C /usr/local

如果下载的很慢就使用ftp:

注意ftp连接失败的话, 看看端口号是否21改成22,即使用sftp连接.

环境变量

1
2
3
4
5
6
export HADOOP_HOME=/usr/local/hadoop
export PATH=$PATH:$HADOOP_HOME/bin:$HADOOP_HOME/sbin
export HADOOP_MAPRED_HOME=$HADOOP_HOME
export HADOOP_COMMON_HOME=$HADOOP_HOME
export HADOOP_HDFS_HOME=$HADOOP_HOME
export YARN_HOME=$HADOOP_HOME

必须配置JAVA_HOME

  1. core-site.xml
1
2
3
4
5
6
7
8
9
10
11
12
13
14
<configuration>        
<property>
<name>fs.defaultFS</name>
<value>hdfs://Master:9000</value>
</property>
<property>
<name>hadoop.tmp.dir</name>
<value>file:/home/bigdata/tmp</value>
</property>
<property>
<name>io.file.buffer.size</name>
<value>131702</value>
</property>
</configuration>
  1. yarn-site.xml
1
2
3
4
5
6
7
8
9
10
11
12
13
14
15
16
17
18
19
20
21
22
23
24
25
26
27
28
29
30
<configuration>
<property>
<name>yarn.nodemanager.aux-services</name>
<value>mapreduce_shuffle</value>
</property>
<property>
<name>yarn.nodemanager.aux-services.mapreduce.shuffle.class</name>
<value>org.apache.hadoop.mapred.ShuffleHandler</value>
</property>
<property>
<name>yarn.resourcemanager.address</name>
<value>Master:8032</value>
</property>
<property>
<name>yarn.resourcemanager.scheduler.address</name>
<value>Master:8030</value>
</property>
<property>
<name>yarn.resourcemanager.resource-tracker.address</name>
<value>Master:8031</value>
</property>
<property>
<name>yarn.resourcemanager.admin.address</name>
<value>Master:8033</value>
</property>
<property>
<name>yarn.resourcemanager.webapp.address</name>
<value>Master:8088</value>
</property>
</configuration>
  1. hdfs-site.xml , 创建namenode和datanode
1
2
sudo mkdir -p /home/hdfs/namenode
sudo mkdir -p /home/hdfs/datanode
1
2
3
4
5
6
7
8
9
10
11
12
13
14
15
16
17
18
19
20
21
22
<configuration>
<property>
<name>dfs.namenode.name.dir</name>
<value>file:/hdfs/namenode</value>
</property>
<property>
<name>dfs.datanode.data.dir</name>
<value>file:/hdfs/dfs/datanode</value>
</property>
<property>
<name>dfs.replication</name>
<value>3</value>
</property>
<property>
<name>dfs.namenode.secondary.http-address</name>
<value>Master:9001</value>
</property>
<property>
<name>dfs.webhdfs.enabled</name>
<value>true</value>
</property>
</configuration>
  1. 配置slaves 3.0是workers
1
2
x.x.x.x worker1
x.x.x.x worker2
  1. 格式化namenode
1
$ hadoop namanode -format

Spark安装部署

官网下载: https://spark.apache.org/downloads.html

1
2
3
4
$ sudo tar zxvf spark-2.4.0-bin-hadoop2.6.tgz -C /usr/local
$ sudo ln -s spark-2.4.0-bin-hadoop2.6/ spark24
$ cd ~
$ sudo vim .profile

添加环境变量

1
2
3
# spark
export SPARK_HOME=/usr/local/spark24
export PATH=$PATH:$SPARK_HOME/bin
  1. 打开/etc/hosts
1
2
3
x.x.x.x Master
x.x.x.x worker1
x.x.x.x worker2
  1. 配置
1
2
3
$ cd /usr/local/spark24
$ cd conf
$ sudo spark-env.sh
1
2
3
4
5
6
7
8
9
10
11
12
13
14
15
16
17
18
19
xyxj@u18_data1:~$ cd /usr/local/spark24
xyxj@u18_data1:/usr/local/spark24$ ls
bin data jars LICENSE NOTICE R RELEASE yarn
conf examples kubernetes licenses python README.md sbin
xyxj@u18_data1:/usr/local/spark24$ cd conf
xyxj@u18_data1:/usr/local/spark24/conf$ ls
docker.properties.template slaves.template
fairscheduler.xml.template spark-defaults.conf.template
log4j.properties.template spark-env.sh.template
metrics.properties.template
xyxj@u18_data1:/usr/local/spark24/conf$ sudo cp spark-env.sh.template spark-env.sh
[sudo] password for xyxj:
xyxj@u18_data1:/usr/local/spark24/conf$ ls
docker.properties.template slaves.template
fairscheduler.xml.template spark-defaults.conf.template
log4j.properties.template spark-env.sh
metrics.properties.template spark-env.sh.template
xyxj@u18_data1:/usr/local/spark24/conf$ sudo vim spark-env.sh
xyxj@u18_data1:/usr/local/spark24/conf$ sudo cp slaves.template slaves

在末尾添加:

1
2
3
4
5
# mine settings
export JAVA_HOME=${JAVA_HOME}
export SCALA_HOME=${SCALA_HOME}
export SPARK_MASTER_IP=192.168.80.128
export SPARK_WORKDER_MEMORY=1g

在slaves后加入

1
2
3
4
5
6
7
8
9
10
11
12
13
14
15
16
17
18
19
20
#
# Licensed to the Apache Software Foundation (ASF) under one or more
# contributor license agreements. See the NOTICE file distributed with
# this work for additional information regarding copyright ownership.
# The ASF licenses this file to You under the Apache License, Version 2.0
# (the "License"); you may not use this file except in compliance with
# the License. You may obtain a copy of the License at
#
# http://www.apache.org/licenses/LICENSE-2.0
#
# Unless required by applicable law or agreed to in writing, software
# distributed under the License is distributed on an "AS IS" BASIS,
# WITHOUT WARRANTIES OR CONDITIONS OF ANY KIND, either express or implied.
# See the License for the specific language governing permissions and
# limitations under the License.
#

# A Spark Worker will be started on each of the machines listed below.
workder1
workder2

启动

1
2
3
4
5
6
7
8
9
10
11
12
13
14
15
16
17
hadoop namenode -format
xyxj@Master /u/l/hadoop-2.6.0> hadoop namenode -format
DEPRECATED: Use of this script to execute hdfs command is deprecated.
Instead use the hdfs command for it.

19/01/10 10:04:30 INFO namenode.NameNode: STARTUP_MSG:
/************************************************************
STARTUP_MSG: Starting NameNode
STARTUP_MSG: host = Master/0.0.0.0
STARTUP_MSG: args = [-format]
STARTUP_MSG: version = 2.6.0
...
19/01/10 10:04:31 INFO util.ExitUtil: Exiting with status 1
19/01/10 10:04:31 INFO namenode.NameNode: SHUTDOWN_MSG:
/************************************************************
SHUTDOWN_MSG: Shutting down NameNode at Master/0.0.0.0
************************************************************/

分别启动
sudo start-dfs.sh
sudo start-yarn.sh

使用pssh

安装

1
2
3
4
5
6
sudo apt-get install pssh
# centos
# 安装好 epel 源
yum install -y epel-release
# 安装 pssh 工具包
yum install -y pssh

设置

1
2
3
4
5
6
7
8
9
10
11
12
13
14
15
16
17
18
19
20
21
22
echo "alias pssh=parallel-ssh" >> ~/.bashrc && . ~/.bashrc
echo "alias pscp=parallel-scp" >> ~/.bashrc && . ~/.bashrc
echo "alias prsync=parallel-rsync" >> ~/.bashrc && . ~/.bashrc
echo "alias pnuke=parallel-nuke" >> ~/.bashrc && . ~/.bashrc
echo "alias pslurp=parallel-slurp" >> ~/.bashrc && . ~/.bashrc

--version:查看版本
--help:查看帮助,即此信息
-h:主机文件列表,内容格式"[user@]host[:port]"
-H:主机字符串,内容格式"[user@]host[:port]"
-l:登录使用的用户名
-p:并发的线程数【可选】
-o:输出的文件目录【可选】
-e:错误输入文件【可选】
-t:TIMEOUT 超时时间设置,0无限制【可选】
-O:SSH的选项
-v:详细模式
-A:手动输入密码模式
-x:额外的命令行参数使用空白符号,引号,反斜线处理
-X:额外的命令行参数,单个参数模式,同-x
-i:每个服务器内部处理信息输出
-P:打印出服务器返回信息

拷贝公钥

1
2
3
4
5
6
7
8
9
10
11
12
13
14
15
16
17
18
19
20
21
22
23
24
25
26
27
28
29
xyxj@Master:~$ ps aux | grep ssh
root 881 0.0 0.3 31528 6336 ? Ss 02:41 0:00 /usr/sbin/sshd -D
root 5183 0.0 0.3 63244 7156 ? Ss 08:48 0:00 sshd: xyxj [priv]
xyxj 5303 0.0 0.2 63244 4488 ? S 08:48 0:00 sshd: xyxj@notty
xyxj 5306 0.0 0.0 2628 1720 ? Ss 08:48 0:00 /usr/lib/openssh/sftp-server
root 6795 0.0 0.3 62968 6936 ? Ss 09:46 0:00 sshd: xyxj [priv]
xyxj 6893 0.0 0.2 63244 4996 ? S 09:46 0:00 sshd: xyxj@pts/1
root 7275 0.0 0.3 62968 7128 ? Ss 09:59 0:00 sshd: xyxj [priv]
xyxj 7374 0.0 0.2 63244 4780 ? S 09:59 0:00 sshd: xyxj@pts/0
xyxj 8284 0.0 0.2 15312 5548 pts/1 T 10:09 0:00 ssh Master cd /usr/local/hadoop-2.6.0 ; /usr/local/hadoop-2.6.0/sbin/hadoop-daemon.sh --config /usr/local/hadoop-2.6.0/etc/hadoop --script /usr/local/hadoop/sbin/hdfs start secondarynamenode
xyxj 9553 0.0 0.0 6256 824 pts/0 S+ 10:54 0:00 grep --color=auto ssh
#创建密钥
xyxj@Master:~$ ssh-keygen
#拷贝公钥
xyxj@Master:~$ ssh-copy-id -i .ssh/id_rsa.pub -p 22 root@192.168.80.131
/usr/bin/ssh-copy-id: INFO: Source of key(s) to be installed: ".ssh/id_rsa.pub"
The authenticity of host '192.168.80.131 (192.168.80.131)' can't be established.
ECDSA key fingerprint is SHA256:PNQmA4f5ihVYBSlRRsD9ethRmG6R5o3rz/ynQTcPJlM.
Are you sure you want to continue connecting (yes/no)? yes
/usr/bin/ssh-copy-id: INFO: attempting to log in with the new key(s), to filter out any that are already installed
/usr/bin/ssh-copy-id: INFO: 1 key(s) remain to be installed -- if you are prompted now it is to install the new keys
xyxj@192.168.80.131's password:
Permission denied, please try again.
xyxj@192.168.80.131's password:

Number of key(s) added: 1

Now try logging into the machine, with: "ssh -p '22' 'xyxj@192.168.80.131'"
and check to make sure that only the key(s) you wanted were added.

这是在worker1客机就生成了 authorized_keys

允许root ssh登录

1
2
sudo vim /etc/ssh/sshd_config #将PermitRootLogin yes
sudo /etc/init.d/ssh restart

向集群拷贝环境

1
2
3
4
5
6
7
8
9
10
11
12
13
14
15
root@Master:~# pscp -h hosts.txt -r /usr/lib/jvm /usr/lib/
[1] 17:02:00 [SUCCESS] root@192.168.80.132
[2] 17:02:00 [SUCCESS] root@192.168.80.131
root@Master:~# pscp -h hosts.txt -r /usr/local/hadoop /usr/local/
[1] 17:04:52 [SUCCESS] root@192.168.80.132
[2] 17:04:52 [SUCCESS] root@192.168.80.131
root@Master:~# pscp -h hosts.txt -r /usr/local/spark24 /usr/local/
[1] 17:05:49 [SUCCESS] root@192.168.80.132
[2] 17:05:49 [SUCCESS] root@192.168.80.131
root@Master:~# pscp -h hosts.txt /etc/hosts /etc/
[1] 17:08:32 [SUCCESS] root@192.168.80.131
[2] 17:08:32 [SUCCESS] root@192.168.80.132
root@Master:~# pscp -h hosts.txt /root/.profile /root
[1] 17:09:30 [SUCCESS] root@192.168.80.132
[2] 17:09:30 [SUCCESS] root@192.168.80.131

有个问题: 在启动的时候hadoop和spark都是带上版本号的,所以上面要重新传一下或者改成hadoop-2.6.0等

然后进行链接:

1
2
3
4
5
6
7
8
9
10
11
root@Master:~# pscp -h hosts.txt -r /usr/local/hadoop-2.6.0 /usr/local/
[1] 17:22:04 [SUCCESS] root@192.168.80.132
[2] 17:22:05 [SUCCESS] root@192.168.80.131
root@Master:~# pscp -h hosts.txt -r /usr/local/spark /usr/local/
spark24/ spark-2.4.0-bin-hadoop2.6/
root@Master:~# pscp -h hosts.txt -r /usr/local/spark-2.4.0-bin-hadoop2.6/ /usr/local/
[1] 17:23:49 [SUCCESS] root@192.168.80.131
[2] 17:23:49 [SUCCESS] root@192.168.80.132

# 链接
> ln -s hadoop-2.6.0 hadoop | ln -s spark-2.4.0-bin-hadoop2.6/ spark24

启动

1
2
3
/usr/local/hadoop/bin/hadoop namenode -format
/usr/local/hadoop/sbin/start-dfs.sh
/usr/local/hadoop/sbin/start-yarn.sh

hadoop启动成功

1
2
3
4
5
6
7
8
9
10
11
12
13
14
15
16
17
18
19
root@Master:~# /usr/local/hadoop/sbin/start-dfs.sh
Starting namenodes on [Master]
root@master's password:
Master: starting namenode, logging to /usr/local/hadoop-2.6.0/logs/hadoop-root-namenode-Master.out
192.168.80.132: datanode running as process 2456. Stop it first.
worker2: datanode running as process 2456. Stop it first.
192.168.80.131: datanode running as process 1953. Stop it first.
worker1: datanode running as process 1953. Stop it first.
Starting secondary namenodes [Master]
root@master's password:
Master: secondarynamenode running as process 2895. Stop it first.

root@Master:~# /usr/local/hadoop/sbin/start-yarn.sh
starting yarn daemons
resourcemanager running as process 4634. Stop it first.
192.168.80.132: nodemanager running as process 3411. Stop it first.
worker2: nodemanager running as process 3411. Stop it first.
worker1: nodemanager running as process 2888. Stop it first.
192.168.80.131: nodemanager running as process 2888. Stop it first.

spark

1
2
3
4
5
6
root@Master:~# /usr/local/spark24/sbin/start-all.sh
starting org.apache.spark.deploy.master.Master, logging to /usr/local/spark24/logs/spark-root-org.apache.spark.deploy.master.Master-1-Master.out
workder2: Warning: Permanently added 'workder2' (ECDSA) to the list of known hosts.
root@workder2's password:
workder2: starting org.apache.spark.deploy.worker.Worker, logging to /usr/local/spark24/logs/spark-root-org.apache.spark.deploy.worker.Worker-1-Master.out
workder1: ssh: Could not resolve hostname workder1: Temporary failure in name resolution

在master上执行jps

1
2
3
4
5
6
7
root@Master:~# jps
9127 NameNode
9704 Worker
4634 ResourceManager
9403 SecondaryNameNode
9756 Jps
9534 Master

问题

workder1: Warning: Permanently added ‘workder1’ (ECDSA) to the list of known hosts.

1
2
3
vim  /etc/ssh/ssh_config
#StrictHostKeyChecking ask去掉注释
StrictHostKeyChecking no
Donate comment here